Thursday, March 30, 2017

Levitation


Levitation images are magical! They draw the viewer in and make them think about what’s not quite right. However, levitation photography hasn’t become wildly popular yet. I assume it’s because levitation photography looks really difficult. I think most people would be surprised to learn that in its most basic form, it’s just combining two or more images in editing software.

Tip #1 – Gather Your Equipment

In order to create a levitation photograph, you must have: a camera (that has manual focus capabilities), a tripod, a willing model, and something to prop your model up (a stool, chair, or ladder). Optional items: a strong fan (if your model has medium to long hair), and a camera remote.

Tip #2 – Tell Your Model What to Wear

Clothing can make or break a levitation image.

  • Solid color clothing is best. Prints and patterns can make it difficult if you need to clone out certain parts of clothing or liquefy fabric.
  • Tell your model not to wear a jacket or sweater. Anytime the model lays upside-down, or sideways, the garment should be hanging down. But if he/she is laying on a stool, the jacket won’t be able to naturally hang leaving the image looking less realistic.
  • If you’re going for a feminine levitation shot, long dresses, skirts, or extra flowing fabric can help create the look you’re going for.

Tip #3 – Shoot on a Cloudy Day

Sun and harsh shadows have the potential to create a lot of extra work for you in post-production. Editing out the stools and ladders, yet keeping a realistic shadow of your subject can turn into a job for Photoshop experts.

Tip #4 – Shoot from a Low Angle

You will want to shoot from a low perspective to give the illusion that your subject is high in the air. However, be mindful of how low you are. If you are lower than the prop your model is standing/laying on, the prop will block parts of his/her body. It is safest to shoot in line with the top of the prop your model is on. Having your model situated at the very front of the prop will also lessen the chance of cutting into the body.

Tip #5 – Always Photograph the Empty Background

When preparing to photograph the frames that will create your final levitation image, follow these steps.
  1. Set up your shot with your model in the frame.
  2. Plan the angle you are going to shoot from and set up your camera on the tripod.
  3. When your model is in place, choose the focus point on your subject.
  4. Set your camera to manual focus and don’t touch it!
  5. Take the different shots suggested below, in Tip #6, without moving your focus point or your camera.
  6. After you’re sure you’ve captured all the images you need with your model and props, remove EVERYTHING from the scene. Photograph ONLY the empty background. This is the most important image you will take.

Tip #6 – Take Multiple Shots to Create One Image

The most basic levitation image is a composition of two or more frames. At the bare minimum, you will need at least a shot of the background and one of the model in that background.
Most great levitation images use a few more frames to add interest and make the final image more provoking. Here is a list of some shots you might want to take all without changing the focus and position of the camera:
  1. Model on the prop(s) – the focus of this shot is on what the arms, legs, and body are doing.
  2. Hair and facial expression – the focus of this shot is to capture the models expression and hair moving like it would naturally if the model was really in that position (floating straight up, blowing behind her, etc.). *Hair dryers and small fans are not strong enough to propel hair in specific directions. The longer and heavier the hair, the more powerful the fan needs to be.
  3. Clothing – the focus of this shot is to capture the movement of the clothing (if needed). If your model is being pulled one direction, what direction should the loose fabric be moving?
  4. Additional props – the focus of this shot is to photograph any extra props you want in the picture (if desired).
  5. Empty background – see Tip #5 above to learn more about the importance of this shot.

Tip #7 – Putting the Images Together

Many levitation photographers use Adobe Lightroom and Photoshop to create their final images. Regardless of your software choice, it is recommended to first color correct the series of shots so they are all the same. Lightroom has a great “sync” feature to make sure the exact same settings are applied to the entire series of images.
Next, open the images in an editing software like Photoshop. Start with the empty background image. Next, add in the main image of your model as a layer with a “Reveal All” mask. Simply use a black paintbrush on the mask to remove the props supporting your model. The end of this article describes each step in more detail. Repeat those steps for each frame you’d like to add. Finally, you can merge your layers and put the finishing touches on your final image. Then voila, you have a gorgeous piece of levitation art.

Some Tips, Tricks, Dos, and Don’ts

by Christopher James
Shoot using a wide angle lens
Shoot using a 35mm or lower focal length to create depth in the image and model simultaneously. I messed around with a bunch of focal lengths at first—mostly with an 85mm at first—but I kept running into an issue where the subject felt out of place as if I had just copy pasted them from another photo without connecting them to the scene.
I later realized that this issue was coming from the compression found at longer focal lengths. The compression made everything so flat that my brain couldn’t realistically believe the model and scene were connected at different points of distance, which would sell the effect.
Shooting around 35 or lower brought in enough distortion to make it look like the model wasn’t some 2d object placed over the ground.

Make sure your model physically connects to the scene
Another way to avoid the “copy-paste” look is to make sure your model makes contact with the environment in unique ways. The idea is that if they’re floating up in the sky without any connection to the scene, it looks fake. But by making sure to get a shadow, reflection, hand on the ground, or even some hair falling it lets the viewers brain know “oh yeah, she’s there”
Try to include at least 2 “connections” if you really want to sell the effect.

Get low
The lower your viewing angle, the larger the gap between the subject and the ground. If you’re too high up, it doesn’t matter if there are 2 inches or 2 feet there, it still looks like they’re on the ground. So get low, create that cap and sell the effect.

Weight distribution
This is the big one. I would spend hours tearing my hair out, wondering why some images worked and others wouldn’t. It’s all about where your model is putting their weight.
The thing is, Our eyes expect to have someone sitting on their butt. So if I take a picture of someone sitting and just remove the chair, its gonna look awful because you can imagine the support even when its not there. The trick is to make it impossible to tell where the supports are (if any). This sells the idea of someone actually floating and not just standing or sitting on something.
Put your supports in places that arch normally or aren’t meant to be load bearing parts of your body. (lower back, back of the heels). These are also places where there isn’t much skin or fat to “flatten out” and look like its being molded to something.

Clothing
The key is flowy, see-thru fabric. Lots of misdirection and motion keeps the viewers eye guessing as to how much movement and support actually was there. I like white dresses and skirts.

Lots of supports
You’re gonna want to experiment with supports of different shapes, sizes, and angles. The universal key here is get something with a low profile (think exercise bench). The less you have to take out in post, the easier it is.
If you get something minimal enough you wont even need the 2nd layer in PS, just a little bit of clone stamping.

Body language
This ones is really hard—certainly the most time-consuming part of the process. Turns out it’s really really difficult to make someone look like they’re floating peacefully and not straining at being upside down or balancing on one foot; however, there are a few ways to help this along:

Thursday, March 2, 2017

10- Depth of Field Vocabulary

Define the following, put on your blog:
  1. Depth of Field-
  2. How to Control Depth of Field-
  3. Exposure Triangle-
  4. Aperture/F-stop-
  5. Aperture Priority-
  6. Al Servo/Continuous Focus
  7. Metering-
  8. ASA/ISO/Film Speed-
  9. Histogram-
  10. Bokeh-
You can find some of the definitions here:
Glossary of Photographic Terms
or here
common photography terms  
Find examples for your journal label each image and guess the aperture settings used on the camera:
  1. Short Depth of Field,
  2. Medium Depth of Field,
  3. Long Depth of Field,
  4. Unusal Focusing
  5. Ambient Light

Tuesday, February 21, 2017

10 White Balance Project

White Balance (WB) is the process of removing unrealistic color casts, so that objects which appear white in person are rendered white in your photo. Proper camera white balance has to take into account the "color temperature" of a light source, which refers to the relative warmth or coolness of white light. Our eyes are very good at judging what is white under different light sources, but digital cameras often have great difficulty with auto white balance (AWB) — and can create unsightly blue, orange, or even green color casts. Understanding digital white balance can help you avoid these color casts, thereby improving your photos under a wider range of lighting conditions.


The White Balance Assignment:

Try all of the Auto White Balance settings on your camera while photographing the exact same scenarios. Don't move a hair. Stay in the exact same place only change the WB on your camera (finish with "Custom" WB). Try 3 different set ups in 3 different kinds of lighting i.e. outside/daylight, interior/fluorescent, interior/incandescent. Make a contact sheet of your different experiments 21 + photos (with WBs labelled).

Photoshop Assignment:

Then select your best composition and blend the 7+ white balance test images into one image using Adobe Photoshop (like your Photo of the Year project). Post your blended white balance scenes in your journal/blog and label the white balance settings on your image.

How to Set Custom White Balance:

1) Hold/Place your 18% Grey Card in the desired lighting & take a photo of it. Ensure you cover the entire frame with the Grey card & expose properly(the exposure meter should be balanced in middle i.e. 0 in your viewfinder).


2) Navigate to the second tab(Shooting Tab 2) under MENU on your Canon EOS DSLR. Select ‘Custom White Balance’. It will now open up the saved images on your memory card & prompt you to select one. Select the one of the Grey card you shot in step #1 above. It will ask you to use White Balance data from this image for custom white balance. Select Ok.


3) Now change the White Balance to ‘Custom’ from MENU & proceed to take your photograph. The photograph should have accurate colours.


Handy tips when using Custom White Balance:

* Once you’ve set a custom white balance for a particular light type (tube-light, bulbs etc), there is no need to set the white balance using grey card again. You only need to redo the above procedure if you happen to change the lighting setup. Remember, once you setup your custom white balance in your camera & start shooting, do NOT change the light setup. Or you’ll be plagued with improper white balance.

* It doesn’t matter if you shoot the Grey card shot in RAW or JPEG for setting Custom White Balance.

* While shooting the Grey card, using spot metering is recommended if you’re not able to get close to fill the entire frame with the Grey card.

* If you don’t have a Grey card, you can use almost any neutral grey surface to set the white balance (some use a white sheet of paper, but some white is not true white). If the surface is not totally neutral, you may need to make fine adjustments to your white balance later on computer in-spite of using a custom white balance.

9 Element of Design: TEXTURE

Texture describes a surface while conveying an emotional effect. Light helps one to see and capture texture. Texture can be accentuated by light from the side in early sunny mornings or early evenings, or by overhead light when the sun is vertical and high in the sky. It also depends upon where the photographer places themselves while they are taking capturing the texture.


Texture Assignment:
Take 20-30 digital photographs of the Element of Design- TEXTURE
Download, edit and evaluate, save top three to sharing folder.
Upload your best photo to your personal blog with definition of texture and an explanation as why this image is a good example of texture.

Thursday, February 2, 2017

Favourite Photo

Today we are going to set up student class blogs. Personalize your blog, make it yours.

Then create your first post about your favourite photo. Write a few things about your photo,

  1. Describe your favourite photo
  2. Why is it your favorite? 
  3. What is special about the photo? 

Then share something about your interests, experiences in Photography.What do you want to learn this semester?

Thursday, November 24, 2016

10- Developing Film Step by Step

https://photography.tutsplus.com/tutorials/step-by-step-guide-to-developing-black-and-white-t-max-film--photo-2580

Once you have found a light-safe a spot, get the developing tank, reels, film, a bottle opener and a pair of scissors.
Turn off all lights and use the can opener to pry the top off the film canister. (It is not a bad idea to make a second check for any sources of light before this step)
Open Canister
Touching the emulsion side of the film will affect the chemicals in the developing process, so try to remove the film without making any contact with the film itself. Holding only the plastic knob that sticks out of the canister, pull the film out of the canister. The film will unravel but try not to let it touch the ground.
Remove Film
Without touching the emulsion side of the film, use your thumb and forefinger to grip the film by the edges and feel toward the end of the film. The end of your film has no exposures on it, so it is safe to touch. Using your fingers as a guide, find your scissors and cut the ‘tongue’ off your film.
Even Film
Once the film has an even end, it can be loaded on the reel. Take a reel and feed the first piece of film onto it. It may resist at first but once it passes the ball bearing it seems to pop onto the track. (Remember not to touch the emulsion in areas where the film was exposed).
Most plastic reels have a self feeding oscillating mechanism that allows the user to feed the film without touching the film. Rotate one side of the reel about 1/8th of a turn and return it to it’s original position, as this action is repeated the film will wind around the track without any significant problems.
Loading the Reel
Toward the end of the reel, you will feel the plastic spindle that was used to pull the film out of the canister. It will find it’s way into your palms as you wind up your film. Take the scissors and cut this plastic spindle free and continue to load the rest of your film.
Do not pull the tape off the film, as it can cause a small amount of static that can fog your negatives. Once all your film is loaded onto reels place the reels inside your light safe tank and close it up. Be sure that it is secured and all reels are safely inside.
At this point it is safe to turn on the lights and clean up the canisters, lids spindle and discarded film that you have dropped.
Cut Spindle
There are a few techniques that should be covered before beginning the developing process. The quarter turn and tilt agitations are an essential part of developing T-MAX. The quarter turn inversions are used to make sure that all parts of the film get exposed to the chemicals (see the image below). These inversions should take about 1 second and will be repeated several times in the process, so practicing before you start the process is advised.
Agitations
Because timing of chemical baths must be precise when developing film, it is important to have all your chemicals measured out ahead of time. When one chemical has been exposed to the film for the suggested time you should be able to pour it out and have it replaced within 10 seconds.
It is also important to remember that, while most developing tanks take about 20 fl. oz to cover reels, your tank may differ. Check the recommended volume of the tank before pouring chemicals. There is a guide on the bottom of most plastic developing tanks with the recommended amount of chemicals.
Tank
When all of the chemicals are prepared and your film is loaded in the developing tank, you are ready to start the developing process. Pour enough water to fill your tank and let your negatives soak for 1 minute.
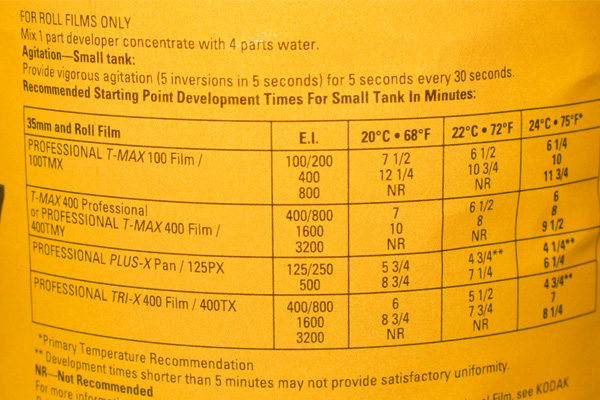
You should have already measured out the amount of developer that it takes to cover your reels. The developer should be maintained at 72° but if you are finding it difficult to do that the container has this chart. Pour out the water and pour in the T-MAX Developer.
Once your solution is poured agitate by giving your developing tank the quarter turn and tilt agitations shown in Step 10. Repeat this process 30 times in 30 seconds. Tap to the bottom of your tank, allow the tank to sit for 25 seconds. Agitate again for 5 seconds, tap the bottom again and allow to sit for 25 seconds.
This process of 5 inversions followed by 25 seconds of idleness should be repeated until the developer has had 6 1/2 to 7 minutes in the tank. Pour out and discard your developer.
Developer
Pour in 20oz of stop bath and agitate with 1/4 turn inversions for 30 seconds. Pour out and discard.
Stop
Pour in 20oz of fixer. Complete 3 1/2 to 8 minutes of cycles that consist of 15 one second inversions, 3 taps and 45 second rests. Once this step is complete you can open your light safe tank to observe your negatives. If your negatives appear purple and thick continue this process for another cycle and check again.
New fixer takes about 3 1/2 minutes, and as you recycle your fixer it will take up to 8 minutes to properly fix your negatives. Once your negatives are similar to the ones shown pour your fixer back into it’s container. If it takes more than 8 minutes for your negatives to clear up it is probably time for new fixer!
Fixer
Refasten the lid to your tank and give your negatives a 60 second water wash, then discard the water.
Wash
Use enough HCA to cover your reels. Follow by 1 full minute of full agitation (1 second 1/4 turn inversions). Hypo can be recycled, but it is difficult to tell when the mixture is getting weak.
Hypo
Give your negatives a 5 minute running water wash. Remove light safe lid and let water pour directly onto the reels.
5 Minute Wash
Toward the end of the water wash apply 2 drops of Photo Flo. Rotating your negatives in this solution helps to distribute the Photo Flo.
Agitations
Remove the negatives from their reels and hang them in a clean dust free area. Do not touch the negatives with dry fingers, but wet your hands in Photo Flo solution and lightly run fingers along drying film to remove excess water. Negatives should be given at least 2 hours before you touch them again.
Drying
Once you have your negatives, you will probably want to put them into a archival sleeve whether you are using an enlarger to make a contact sheet and prints later, or you are just scanning them to a digital format.
I use Print File's Contact proofing preserver because I like to store the contact sheet right on top of the negatives for easy proofing. You will probably cut after either every 5 frames or 6 frames depending on the negative preserver.
Cutting & Archiving
It helps if you have access to a light table here, but you can just as easily hold your negatives into any light source to examine them. A well developed negative has both areas that are fully thick but still has areas where the negative is completely transparent.
Thin negatives will result in very gray prints concentrated in the mid tone range, whereas overly thick negatives will result either in prints that are too light and lack detail or gray negatives that appear blurry and fogged.
Inspect the negatives for watermarks, scratches and dust. Scratches to the emulsion side of the film are very difficult to fix. Dust and watermarks are easily removed with an anti-static or micro-fiber cloth (be careful to use clean lintless fabric that is free of grit or dirt they will scratch your negatives).
Final
Here is an example of a well developed film. Notice there are areas where the film is comply transparent and there are areas where the negative is completely black. This will result in a print with a full tonal range.
Well Exposed Negatives
If your negatives are thin, you underexposed. If you have negatives similar to these you will end up having a print that is gray and muddy. In the printing process you can try to fix this with high contrast filters that but overall you will end up loosing a lot of the grayscale. There values look unnatural compared with that of a well exposed negative.
Thin Negatives
If your negatives are too thick, you overexposed. While slightly overexposed images have higher contrast prints overall you will loose a few mid-tones. Overly thick negatives will give you a gray print, but unlike underexposed negatives there will be a lot more dark tones. If a negative is very thick, reciprocity failure becomes an issue (this negative is also slightly fogged).
Thick Negatives
In this case your film came off the track when were loading the reels. It is rare to have this happen with plastic reels but if metal reels are used it is a more common mistake. If you continue to have these results try practicing with an exposed roll of film with the lights on.
Undeveloped spots