 White Balance (WB) is the process of removing unrealistic color casts, so that objects which appear white in person are rendered white in your photo. Proper camera white balance has to take into account the "color temperature" of a light source, which refers to the relative warmth or coolness of white light. Our eyes are very good at judging what is white under different light sources, but digital cameras often have great difficulty with auto white balance (AWB) — and can create unsightly blue, orange, or even green color casts. Understanding digital white balance can help you avoid these color casts, thereby improving your photos under a wider range of lighting conditions.
 The White Balance Assignment:
Try all of the Auto White Balance settings on your camera while photographing the exact same scenarios. Don't move a hair. Stay in the exact same place only change the WB on your camera (finish with "Custom" WB). Try 3 different set ups in 3 different kinds of lighting i.e. outside/daylight, interior/fluorescent, interior/incandescent. Make a contact sheet of your different experiments 21 + photos (with WBs labelled).
Photoshop Assignment:
Then select your best composition and blend the 7+ white balance test images into one image using Adobe Photoshop (like your Photo of the Year project). Post your blended white balance scenes in your journal/blog and label the white balance settings on your image.
How to Set Custom White Balance:
1) Hold/Place your 18% Grey Card in the desired lighting & take a photo of it. Ensure you cover the entire frame with the Grey card & expose properly(the exposure meter should be balanced in middle i.e. 0 in your viewfinder).

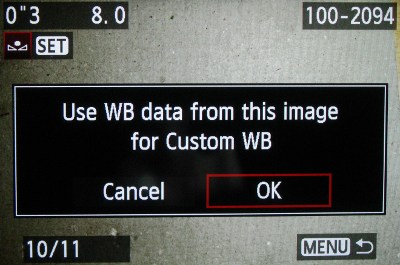
2) Navigate to the second tab(Shooting Tab 2) under MENU on your Canon EOS DSLR. Select ‘Custom White Balance’. It will now open up the saved images on your memory card & prompt you to select one. Select the one of the Grey card you shot in step #1 above. It will ask you to use White Balance data from this image for custom white balance. Select Ok.
3) Now change the White Balance to ‘Custom’ from MENU & proceed to take your photograph. The photograph should have accurate colours.
Handy tips when using Custom White Balance:
* Once you’ve set a custom white balance for a particular light type (tube-light, bulbs etc), there is no need to set the white balance using grey card again. You only need to redo the above procedure if you happen to change the lighting setup. Remember, once you setup your custom white balance in your camera & start shooting, do NOT change the light setup. Or you’ll be plagued with improper white balance.
* It doesn’t matter if you shoot the Grey card shot in RAW or JPEG for setting Custom White Balance.
* While shooting the Grey card, using spot metering is recommended if you’re not able to get close to fill the entire frame with the Grey card.
* If you don’t have a Grey card, you can use almost any neutral grey surface to set the white balance (some use a white sheet of paper, but some white is not true white). If the surface is not totally neutral, you may need to make fine adjustments to your white balance later on computer in-spite of using a custom white balance.

No comments:
Post a Comment