Thursday, November 24, 2016

10- Developing Film Step by Step

https://photography.tutsplus.com/tutorials/step-by-step-guide-to-developing-black-and-white-t-max-film--photo-2580

Once you have found a light-safe a spot, get the developing tank, reels, film, a bottle opener and a pair of scissors.
Turn off all lights and use the can opener to pry the top off the film canister. (It is not a bad idea to make a second check for any sources of light before this step)
Open Canister
Touching the emulsion side of the film will affect the chemicals in the developing process, so try to remove the film without making any contact with the film itself. Holding only the plastic knob that sticks out of the canister, pull the film out of the canister. The film will unravel but try not to let it touch the ground.
Remove Film
Without touching the emulsion side of the film, use your thumb and forefinger to grip the film by the edges and feel toward the end of the film. The end of your film has no exposures on it, so it is safe to touch. Using your fingers as a guide, find your scissors and cut the ‘tongue’ off your film.
Even Film
Once the film has an even end, it can be loaded on the reel. Take a reel and feed the first piece of film onto it. It may resist at first but once it passes the ball bearing it seems to pop onto the track. (Remember not to touch the emulsion in areas where the film was exposed).
Most plastic reels have a self feeding oscillating mechanism that allows the user to feed the film without touching the film. Rotate one side of the reel about 1/8th of a turn and return it to it’s original position, as this action is repeated the film will wind around the track without any significant problems.
Loading the Reel
Toward the end of the reel, you will feel the plastic spindle that was used to pull the film out of the canister. It will find it’s way into your palms as you wind up your film. Take the scissors and cut this plastic spindle free and continue to load the rest of your film.
Do not pull the tape off the film, as it can cause a small amount of static that can fog your negatives. Once all your film is loaded onto reels place the reels inside your light safe tank and close it up. Be sure that it is secured and all reels are safely inside.
At this point it is safe to turn on the lights and clean up the canisters, lids spindle and discarded film that you have dropped.
Cut Spindle
There are a few techniques that should be covered before beginning the developing process. The quarter turn and tilt agitations are an essential part of developing T-MAX. The quarter turn inversions are used to make sure that all parts of the film get exposed to the chemicals (see the image below). These inversions should take about 1 second and will be repeated several times in the process, so practicing before you start the process is advised.
Agitations
Because timing of chemical baths must be precise when developing film, it is important to have all your chemicals measured out ahead of time. When one chemical has been exposed to the film for the suggested time you should be able to pour it out and have it replaced within 10 seconds.
It is also important to remember that, while most developing tanks take about 20 fl. oz to cover reels, your tank may differ. Check the recommended volume of the tank before pouring chemicals. There is a guide on the bottom of most plastic developing tanks with the recommended amount of chemicals.
Tank
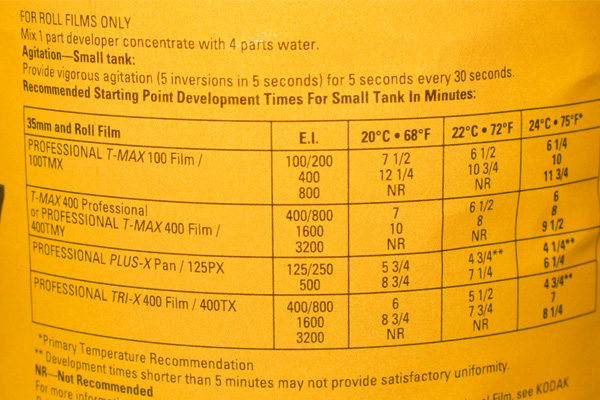
When all of the chemicals are prepared and your film is loaded in the developing tank, you are ready to start the developing process. Pour enough water to fill your tank and let your negatives soak for 1 minute.
You should have already measured out the amount of developer that it takes to cover your reels. The developer should be maintained at 72° but if you are finding it difficult to do that the container has this chart. Pour out the water and pour in the T-MAX Developer.
Once your solution is poured agitate by giving your developing tank the quarter turn and tilt agitations shown in Step 10. Repeat this process 30 times in 30 seconds. Tap to the bottom of your tank, allow the tank to sit for 25 seconds. Agitate again for 5 seconds, tap the bottom again and allow to sit for 25 seconds.
This process of 5 inversions followed by 25 seconds of idleness should be repeated until the developer has had 6 1/2 to 7 minutes in the tank. Pour out and discard your developer.
Developer
Pour in 20oz of stop bath and agitate with 1/4 turn inversions for 30 seconds. Pour out and discard.
Stop
Pour in 20oz of fixer. Complete 3 1/2 to 8 minutes of cycles that consist of 15 one second inversions, 3 taps and 45 second rests. Once this step is complete you can open your light safe tank to observe your negatives. If your negatives appear purple and thick continue this process for another cycle and check again.
New fixer takes about 3 1/2 minutes, and as you recycle your fixer it will take up to 8 minutes to properly fix your negatives. Once your negatives are similar to the ones shown pour your fixer back into it’s container. If it takes more than 8 minutes for your negatives to clear up it is probably time for new fixer!
Fixer
Refasten the lid to your tank and give your negatives a 60 second water wash, then discard the water.
Wash
Use enough HCA to cover your reels. Follow by 1 full minute of full agitation (1 second 1/4 turn inversions). Hypo can be recycled, but it is difficult to tell when the mixture is getting weak.
Hypo
Give your negatives a 5 minute running water wash. Remove light safe lid and let water pour directly onto the reels.
5 Minute Wash
Toward the end of the water wash apply 2 drops of Photo Flo. Rotating your negatives in this solution helps to distribute the Photo Flo.
Agitations
Remove the negatives from their reels and hang them in a clean dust free area. Do not touch the negatives with dry fingers, but wet your hands in Photo Flo solution and lightly run fingers along drying film to remove excess water. Negatives should be given at least 2 hours before you touch them again.
Drying
Once you have your negatives, you will probably want to put them into a archival sleeve whether you are using an enlarger to make a contact sheet and prints later, or you are just scanning them to a digital format.
I use Print File's Contact proofing preserver because I like to store the contact sheet right on top of the negatives for easy proofing. You will probably cut after either every 5 frames or 6 frames depending on the negative preserver.
Cutting & Archiving
It helps if you have access to a light table here, but you can just as easily hold your negatives into any light source to examine them. A well developed negative has both areas that are fully thick but still has areas where the negative is completely transparent.
Thin negatives will result in very gray prints concentrated in the mid tone range, whereas overly thick negatives will result either in prints that are too light and lack detail or gray negatives that appear blurry and fogged.
Inspect the negatives for watermarks, scratches and dust. Scratches to the emulsion side of the film are very difficult to fix. Dust and watermarks are easily removed with an anti-static or micro-fiber cloth (be careful to use clean lintless fabric that is free of grit or dirt they will scratch your negatives).
Final
Here is an example of a well developed film. Notice there are areas where the film is comply transparent and there are areas where the negative is completely black. This will result in a print with a full tonal range.
Well Exposed Negatives
If your negatives are thin, you underexposed. If you have negatives similar to these you will end up having a print that is gray and muddy. In the printing process you can try to fix this with high contrast filters that but overall you will end up loosing a lot of the grayscale. There values look unnatural compared with that of a well exposed negative.
Thin Negatives
If your negatives are too thick, you overexposed. While slightly overexposed images have higher contrast prints overall you will loose a few mid-tones. Overly thick negatives will give you a gray print, but unlike underexposed negatives there will be a lot more dark tones. If a negative is very thick, reciprocity failure becomes an issue (this negative is also slightly fogged).
Thick Negatives
In this case your film came off the track when were loading the reels. It is rare to have this happen with plastic reels but if metal reels are used it is a more common mistake. If you continue to have these results try practicing with an exposed roll of film with the lights on.
Undeveloped spots


Friday, October 28, 2016

Photo 9 Project Check List- Semester 1 Self Assessment

  1. Summer
  2. Elements of Design: Lines - Image, definition & contact sheet
  3. Elements of Design: Shape - Image, definition & contact sheet
  4. Elements of Design: Texture - Image, definition & contact sheet
  5. Camera Care
  6. Camera Modes
  7. Elements of Design: Form/Natural Lighting Portraits - Image, definition & contact sheet
  8. Studio Portrait Self- Image of self.
Check off  assignments completed and posted to your blog
Bold missing assignments.

Self-Assessment of Term 1:
1. Select your favorite assignment

Comment why it is your favourite

Then evaluate your efforts
                   
Photography Topic-   Elements of Design                                            2.5
Technical Skill- Exposure and lighting-                                                2.5
Creativity- Unique treatment of the subject or skill-                          2.5
Professional Quality - Posted with reflection and definition of element of design     2.5            
Total                                                                                                                10

2. Select your least favorite. Explain why it is your least favorite- was it the project in general, or your treatment of it.

What is a goal you want to work on in term 2? 

Photo 10 Project Check List- Semester 1 Assessment

  1. Summer
  2. Horizon Lines Breaking Rules- Image, reflection & contact sheet
  3. Composition Breaking Rules- Image, reflection & contact sheet
  4. Advanced Camera Modes- Identification Questions
  5. Aperture Vocabulary and image examples
  6. Depth of Field- 3 Images, reflection & contact sheet
  7. Natural Lighting Portraits- Image & contact sheet
  8. Studio Portrait Techniques- Set-up examples, Image examples.
  9. Studio Portrait Tests- 3 Images using different lighting techniques of teammate & contact sheet 
  10. Studio Portrait - Image of select person & contact sheet (Semester 2).
Self-Assessment of Term 1:
Select your favorite assignment

Comment why it is your favourite

Evaluate your efforts


Composition Arrangement of Subject & Backgrounds-          2                                    
Photography Technique                                                                2
Technical Skill-                                                                                2
Creativity/Unique treatment of the subject or skill-                2
Professional Quality                                                                        2             
Total

 Select your least favorite. Explain why it is your least favorite- was it the project in general, or your treatment of it.

What are your interested in exploring for term 2? 

Tuesday, October 11, 2016

9 Elements of Design: FORM

Nick Brandt
Edward Weston
Form is basically a three-dimensional shape, and is best accentuated by side lighting since it casts soft elegant shadows, and the difference between light and shadows gives a better illustration of the depth of an object and amplifies the sensual understanding of its meaning and message. Consider where the light is when you take your photo of form, make sure it looks three dimensional, not flat.

Form Assignment:
Take 20-30 digital photographs of the Element of Design- FORM [3-D]
Download, edit and evaluate, save top three to sharing folder.
Upload your best to your personal blog with a definition of form (in your own words) and an explanation as why your image is a good example of form.

Thursday, September 15, 2016

10 Breaking the Rules of Composition

Creative Blur
Composition means arrangement: the orderly putting together of parts to make a unified whole; composition through a personal, intuitive act. However, there are basic principles that govern the way visual elements behave and interact when you combine them inside the four borders of a photograph. Once we have sharpened our vision and grasped these basic ideas of principles, then we will have the potential for making our photographs more exciting and effective than ever before.


Photographers lives through their eyes. The basic way of photographic seeing is an essential step in being able to communicate photographically. In mastering composition, one must cultivate the ability to see shapes, lines, forms, masses, etc., and not to just recognize objects. But when the rules of composition are knowingly "broken", then the image can often become more unique and creative.
Extreme Rule of 3rds

Photo Assignment: Try 5 different breaking the rules of composition techniques in photography, or even invent some of your own to make your photo compositions more creative. We are going to go out and shoot one specific technique (your choice) for three class days, and two after school, or weekend days a different technique each time for a total of five techniques). Starting with digital and for the final roll, we are going to start working with BW. Make a contact sheet and add your five best examples to your blog, explain what technique is being broken and how.


Tilted Horizon
Blog Assignment: Find some examples of breaking the rules of photographic composition. Find 5+ different examples of the ones listed on this post... post your found examples to your blog and title with the technique used.
Over exposed
Unusual Focus
Juxtapositioning


Monday, May 30, 2016

Portraits


Portrait/Form Project Criteria
Take a series of photographs of someone in natural light. The background is as significant as the subject and should be well considered. You are to compose five different portraits in surroundings that describe the person in the photo. Consider your expressions, costumes, props and lighting. (Photos by LFAS Alumni- Greg Swales)


  1. Photograph your partner 25x or more. Make sure you take at least five different photos of each your partner using the same background so that you can have a selection to choose from. Try 2 different backgrounds and different angles, lighting, expressions ... The more pictures you take, the better chance for successful compositions. Be as clear as possible with your idea so that you can clearly communicate to your subjects. 
  2. Make a digital contact sheet.
  3. Upload your 3 favorite images to your blog and share your best with your person. 
  4. Post your partner's image of you on your blog.
Grade 10s 
Consider depth of field in composing your portraits try to use short, medium, and long range of focus using your aperture. Also consider light and experimenting with how light is cast on your subject angles of light etc.

5 Composition Emphasis Techniques

We are going to explore photographic composition for the B/W film project.
 
Find the definition and photo examples of the following terms and post to your blog. In class we will be going over these composition techniques- 5 ways to emphasize the subject:
  1.   - Rule of thirds
  2.   - Patterns and Repetition
  3.   - Leading Lines
  4.   - Framing
  5.   - Contrast
For this assignment, find ONE subject that you want to photograph- could be a friend, an apple, the school, your home, your dog, the bus stop.
Use at least one of the composition EMPHASIS techniques in your photos to enhance your subject to make it more obvious and stand out.
Shoot with B/W film.
Take your photos OUTSIDE using natural light.
You will learn to develop your negatives, make a contact sheet and one print.


Thursday, May 12, 2016

shutter speeds

Slow Shutter Speed
1 or Bulb because the cloud has moved significantly and to capture the movement, you need a really slow shutter. Also the photographer might have used a tripod, and a neutral density filter....

Monday, May 9, 2016

9 Shutter Assignment


1/30 Blur Movement
1/4 Blurry Story
The Assignment- You are to take a series of photographs where you capture movement with your camera by controlling the shutter. You are to try the 6 different shutter speed techniques (see above) but try at least 5+ for each to make sure you practice and get a good example capturing movement.  

The Contact Sheet -Arrange your images in a contact sheet of 30 shutter photos (try several shots for each experiment) and label them with the shutter speed that you tried and the experiment title. Contact label each experiment with the shutter speed that you used.

Post- your 6 best shutter images (one from each experiment) to your blog label with the experiment title and shutter speed that you used.
  1. Blur Movement
  2. Freeze Frame Movement
  3. Panning Fast- Blur background, clear movement.
  4. Panning with Slow Shutter Speed
  5. A Blurry Story
  6. Experimental

Monday, May 2, 2016

Solargraphy Reflections

SCAN each image directly out of the pin hole camera in subdued light.
**DO NOT PUT THE PHOTOS IN THE DEVELOPER**
Post to your blog and comment on your Solargraphy results for each of the three different scenes:
  1. Explain briefly what you did.
  2. Describe the location where you placed the pin hole camera?
  3. Record the length of each exposure: ie. Camera 1: 7 Days, Camera 2: 14 Days.
  4. Note the weather conditions during the time it was open.
  5. Describe the visible information from your solar-print, what do you see, what did not record?

Friday, April 22, 2016

Sunday is World Pinhole Day!!!

Perfect timing! Let's test the cameras today and take some pinhole photos on Sunday.
http://www.pinholeday.org/

Anyone, anywhere in the world, who makes a pinhole photograph on the last Sunday in April, can scan it and upload it to this website where it will become part of the annual Worldwide Pinhole Photography Day celebration's online gallery.

Pinhole Day April 24, 2016

Wednesday, April 13, 2016

Photo 9 Check List

  See specific blog posts relating to each assignment for details and instructions:
  1. Summer photo and reflection.
  2. Ashli Akins/Mosqoy- Response/Reflection
  3. Elements of Design- LINE: Contact sheet 20+, 1 best, and reflection. 
  4. Elements of Design- SHAPE: Contact sheet 20+ photos, best, and reflection. 
  5. Elements of Design- FORM/PORTRAITS: Contact sheet 10+ best, and reflection.
  6. Elements of Design- TEXTURE: Contact sheet 20+, 1 best, and reflection. 
  7. Elements of Design- COLOUR: Contact sheet 20+, 3 bests warm/cool/mixed, definition, and reflection. 
  8. Cherry Blossoms (Could be included for Colour assignment).
  9. Cartoon Portrait- posted to blog.
  10. Pin Hole Camera research.

Photo 10 Check List

  1. Summer photo and reflection
  2. Elements of Design- contact sheet, bests, identification and reflection
  3. Breaking the Rules of Horizons- contact sheet, bests, identification and reflection
  4. Cartoon Portrait- posted
  5. Solarography research and 1st example posted to your blog. 
  6.  Cherry Blossoms

Tuesday, March 1, 2016

Touching-up Portraits Using Photoshop

Use a photo of your self that you have taken already, but if you must, you can go out and take a photo of some one in class.
You are going to learn more basic Photoshop tools:
  • Patch Tool
  • Clone Tool
  • Dodge and Burn Tool
  • Eye Dropper and Air Brushing
  • Cut and Paste (we are going to change the background)
Check out acouple of tutorials:
How to Brighten Eyes
How to touch up portraits- use the patch tool, clone tool,
Or view a tutorial to make a photo into a studio portrait

Monday, February 15, 2016

Arts Matter: Ashli Akins Reflections

Create a new post on your blog titled "Ashli Akins" and respond to the following questions:

Ashli Akins
1. Who is Ashli, what has she done/accomplished?
2. What part of Ashli's story has resonated with you?
3. Find an image of Ashli's on her website www.mosqoy.org or "Google" that helps tell Ashli's story and post it with your responses.

Tuesday, February 9, 2016

Making a Contact Sheet with Adobe Bridge

We are going to learn how to use Adobe Bridge to select, rename and organize your photos into a contact sheet. Bridge has many functions such as batch rename and other utilities to help with organization, and supports editing of digital images in Camera Raw format. Organizational features include assigning colored labels or star ratings to images. And can recognize a variety of file types. Here is a tutorial to clarify: http://youtu.be/6m9nBwiskAQ you only need to watch the first 2:20 mins. Don't change the spacing and keep "file name" turned on.
  1. Open Adobe Bridge
  2. Open the file that holds your photos.
  3. Right click RENAME the photos by the technique you used.
  4. Select the images you want to add to your contact sheet SHIFT click or CTRL click on the photos.
  5. Select "OUTPUT" under the top tool bar.

  6. Go to the Output window on the right of your screen (sometimes it will take a minute to appear).
  7. Select PDF instead of WEB GALLERY.
  8. Under the TEMPLATE option, select CONTACT SHEET (4*5=20 photos or 5*7=35 photos)
  9. Scroll to the very bottom of the Output window to where it says SAVE.
  10. Before you press save, check the "VIEW PDF AFTER SAVE"
  11. Once the PDF opens, FILE>SAVE AS>
  12. Type the assignment name i.e "My Line Contact Sheet" or "Element of Design Contact".
 If you want to upload your contact sheet to your blog-
  1. Open the PDF, 
  2. FILE>"SAVE AS"
  3. SAVE AS "TYPE": Select "JPG"
  4. Make sure you select where you are going to save it to (your personal saving space your student #).
  5. Then press SAVE.
  6. Post to your blog as you would post an image.

Thursday, February 4, 2016

My Favourite Photo

Mitanya Primary School in Nanyuki Kenya
This is my other favourite photo because...