Friday, February 8, 2019

How to create a contact sheet

Here is a quick step-by-step method to create a contact sheet using Adobe Photoshop.
https://helpx.adobe.com/photoshop/how-to/create-contact-sheets.html
[Borrowed from Adobe]

Step 1 of 8:

Put all of the images you want on the contact sheet in one folder on your computer.


Step 2 of 8:

In Photoshop, go to -Automate - Contact Sheet II.


Step 3 of 8:

In the Source Images section of the Contact Sheet II dialog box, choose the folder that contains your images.


Step 4 of 8:

Under Document, set the Units, Width/Height, Resolution, and Mode (color mode) for the contact sheet.


Step 5 of 8:

If desired, select the Flatten All Layers option.


Step 6 of 8:

Under Thumbnails, decide how you want your images arranged on the page.


Step 7 of 8:

Select the Use Filename as Caption option to label each image based on its file name.


Step 8 of 8:

Click OK and Photoshop will create your contact sheet. You can save or print it from the File menu.

Save as File Type: JPEG
Voila!

Thursday, February 7, 2019

10 Breaking the Rules: Horizon Lines

Horizon Lines
Generally horizon lines are in the upper or lower 1/3 in a photograph. Depending on if the sky or ground is most interesting. You are to consider the horizon rule and "play' with it. Try some photos where you follow the rule and then experiment with your horizon line and "break" the rule. Tilt the frame, make the line way up or way low, obscure the line. play with camera placement and angles.
Horizon Line
Line Assignment:
  • Take 10-15 images exploring horizon lines, 
  • Then download the images, 
  • Select your top 2 photos and save them to the share folder.
  • Paste your best image to your blog, 
  • Write out a reflection: identify the subject and explain how the horizon lines effect it.
  • Collect all of your images (up to 30 max) in a contact sheet,
  • Save your contact sheet as a jpg and post to your blog.

Wednesday, February 6, 2019

Composition: Framing

Framing is  ‘a photographic technique used to bring focus to a subject’. Framing immediately brings attention to your subject. Whether it be a very literal frame (that went through a popular “prop” phase), environmental, or structural framing, framing with light or lack of light, they all work well to bring the viewer’s eye to your subject.

Architectural elements are probably the most obvious way to frame a subject:  doorways, window frames, archways, framed mirrors.

Environmental shapes. Photographing through trees, grasses, flowers, or bushes can often bring more attention to your subject by creating a blurred foreground. The eye tends to go toward the in focus areas of the images first.

Looking for the light. Using the available light or lack of to frame your subject is also effective. It is a more subtle approach to framing, in my opinion, but it is a beautiful way to highlight not only your subject, but gorgeous light.

Just about any opening or shape can be used to frame your subject. If it forms a defined area, use it to frame your subject.

Steps:
  1. Take 15-30 images using shapes to frame and emphasize or surround the main subject, 
  2. Then download the images, 
  3. Select your top 2 photos and save them to the share folder.
  4. Post your best image to your blog, 
  5. Title your post using the emphasis technique- Framing with Shapes.
  6. Write out a reflection: identify the subject and explain how the technique emphasizes it.
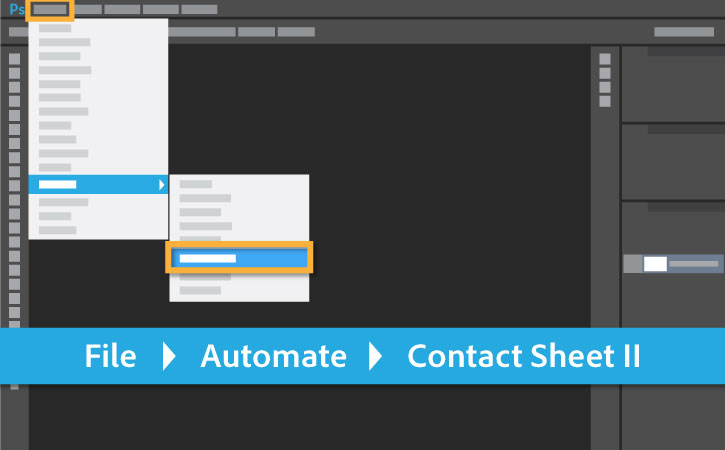
  7. Collect all of your images (up to 40 max) in a contact sheet,
  8. Save your contact sheet as a jpg and post to your blog.
    ** Next try Rule of Thirds and repeat the steps, after that focus on Repetition and finally Contrast.

    Monday, February 4, 2019

    My Community

    Write a short paragraph or in point form about this image:
    • Why did you capture this part of your community? 
    • How is this significant to you? 
    • Where is this?

    Sunday, February 3, 2019

    9 Camera Modes Identification

    Finally! We are going to learn about real cameras... You must do the Camera Mode Identification questions before you start shooting with a DSLR. Identify the name of each of the camera modes below AND explain their functions in your own words:
      Here's a link to help you find answers:
      Camera Modes
      Digital Photography
      Understanding White Balance

      When you are finished camera modes, do this assignment too:
      Camera Care


      10 Advanced Camera Modes

       Identify what the back of this camera is telling you:
      Identify Camera Settings for Questions 1-5

      Identify the settings from the prompts below that correspond to  the Canon camera back (see image). What is that setting? How it will it control the image?:

      1. Setting/Mode
      2. Shutter Speed
      3. Aperture
      4. ISO
      5. White Balance


      Define and explain how it is relevant to Photography
      #6
      (if necessary).
      6. Identify the symbol-title and function.
      7. DSLR
      8. Aperture Priority
      9. ASA/ISO
      10. Bracketing
      11. Histogram
      12. Camera RAW
      13. Single Servo AF
      14. Continuous Servo AF Focus
      15. Stopping Down


      Canon Manual, go to page 20
      Quick Control Menu
      8 Things Your DSLR Can Do
      Understanding White Balance

      9 Camera Care

      Visit a Camera Care Web Site:

      Make helpful some notes about camera care:
      1. What should you avoid to protect your camera?
      2. What do you use to clean your camera lens, what not to use (too much)?
      3. How do you store your camera, what do you do with your batteries when you aren't using your camera?
      4. Preventative maintenance tip...